Providing Suggestions to Users along with Original Intent Answer
In the age of chatbots, it is hard to anticipate the various pathways that a user may take while conversing with a chatbot, making it difficult to create a chatbot that can answer every enquiry from the user.
To make sure the user has something to ask about and that lies in the scope of the chatbot we can give suggestions to the user in the form of buttons on which different queries are written. Users can click on any of the provided buttons or can type their own questions.
This helps in two ways:
- Firstly, The user now has a series of questions and answers to that are only a click away.
- Secondly, this helps in keeping the user in the scope of the chatbot
Example Scenario
There is a chatbot that is trained in such a way that it can handle user queries related to the general concepts of machine learning. The goal of this chatbot is to provide definitions of different concepts that are there in machine learning like “what is mean square error?” or “what is linear regression?” etc.
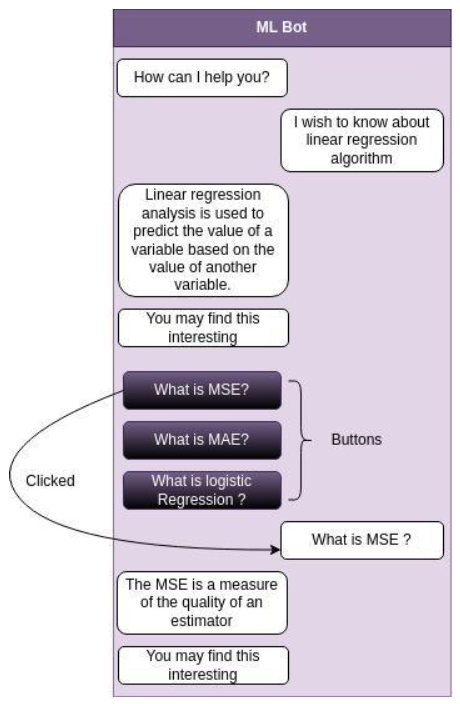
Suppose a user comes and asks “What is linear regression?” and the chatbot will provide an answer for it and that’s it, now it’s up to the user whether he/she wants to ask something else or not.
Now, consider another scenario where the user asks the same question “what is linear regression?” but this time along with the answer to the user’s query chatbot provides a list of suggestions that are similar to the user’s query. This would give rise to curiosity in users’ minds and tempt them to click on one of the suggested buttons leading to a longer and better engagement with the user.
Before starting with implementation let’s first set up RASA on our system
The very first thing that you need to do is create a virtual python environment for which you can use one of the following
- Miniconda or Anaconda
https://docs.conda.io/en/latest/miniconda.html
https://www.anaconda.com/ - venv python package
https://docs.python.org/3.8/tutorial/venv.html
I will be using miniconda to create the virtual environment (Anaconda will be used in a similar manner).
Steps to follow:
-
- Open the terminal and type conda and hit Enter key on the keyboard
If you get an output like this then you are good to move to the next step otherwise you might want to look at one of the below-mentioned links
Windows user – https://stackoverflow.com/questions/44597662/conda-command-is-not-recognized-on-windows-10
Linux user – https://linuxhint.com/conda-command-not-found/
Mac user – https://stackoverflow.com/questions/35246386/conda-command-not-found
- Open the terminal and type conda and hit Enter key on the keyboard
- Creating an environment
Syntax – conda create -n python=3.8
Example – conda create -n rasa3 python=3.8
This will install the latest python 3.8 version and create a virtual environment with the name rasa3. - Activate the virtual environment created in the above step
Syntax – conda activate
Example – conda activate rasa3
This will activate the virtual environment. - Install rasa in the virtual environment which is activated in the above step
Command – pip install rasa
This will install the latest version of rasa.
Once rasa is installed we are ready to initialize a new project using rasa.
Following are the steps –
- Create a new directory on your system
- Open that directory in the terminal
- Activate the rasa environment
Command – conda activate rasa3 - Run the command
rasa init
This will initialize a new project and the required file structure.- Actions
actions.py – This file contains all the custom action code in Python that we want our chatbot to execute. - Config
The pipeline for the rasa framework is defined here. Rasa uses this pipeline to train the model. - Credentials
This file is used to define the credentials of the applications like Telegram, Whatsapp, etc. To which we want our application to connect. - Data
nlu.yml – In this file, we write the intents and their examples so that the chatbot can learn and understand the intents.
stories.yml – In this file, we can write the conversation paths.
rules.yml – This defines the rules for the chatbot. - domain
This file acts as the universe of the bot here whatever we want our bot to know is defined like the intents, responses, actions, etc. - Endpoints
This file contains the different server endpoints that the chatbot can use.
- Actions
- Now open this folder in an IDE (I will be using VS Code).
Let’s make the required changes to the files and train the model.
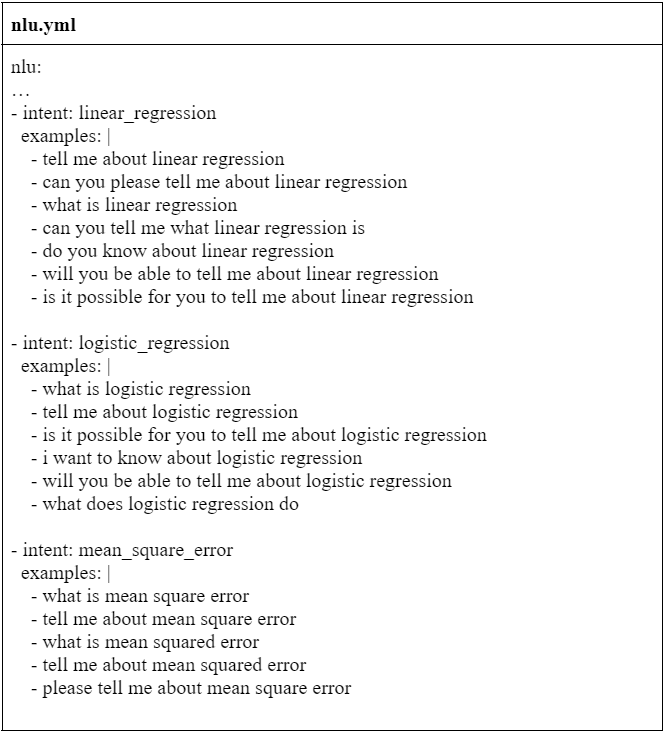
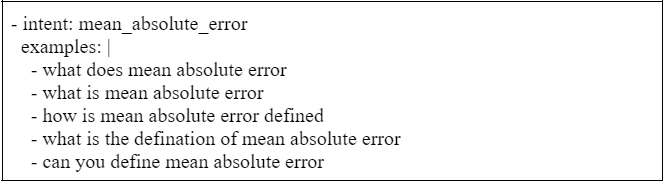
- Open the nlu.yml file and add the following intents and examples
We will be adding 4 new intents along with the examples.
- Open rules.yml and do the following changes
Create rules for each intent as following
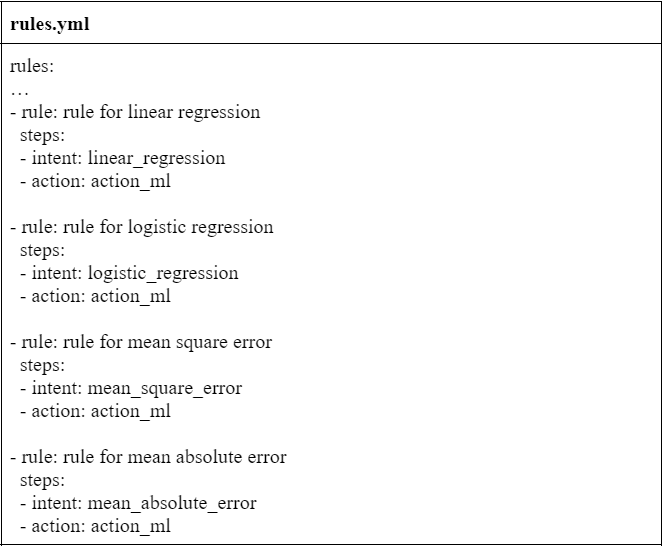
Here, the action => action_ml is a custom action which we will be created in later steps. - Open the domain.yml file and do the following changes
Register the intents that we have added in nlu.yml
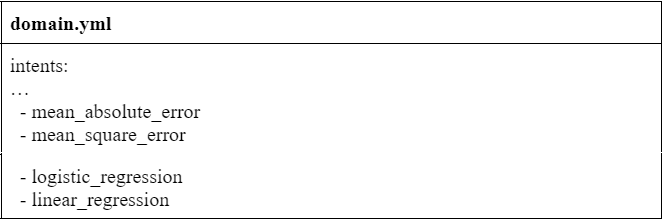
Register the custom action that we will be building in next step

- Open endpoints.yml and uncomment the following line to make sure chatbot can connect with the action server.

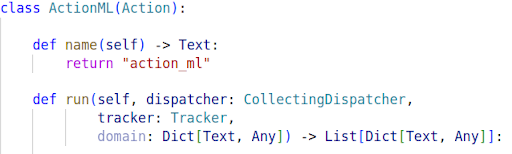
- Open actions.py file to create a custom action named “action_ml”
To implement a custom action we need to create a class that would inherit from rasa_sdk. Action class and we need to define two methods in this class as follows
Let’s discuss the approach that will be used for providing suggestions to the user.
- When a user asks a query to the chatbot rasa performs a multi-intent classification that classifies the user’s intent
- Now this intent classification provides us with the probabilities of all the intents and from this the intent with maximum probability is used to provide answers to the user.
- What we will do is we will make use of the probabilities of other intents as well since these probabilities ultimately tell how likely the user’s intent was to be one of the other intents and we can show them to the user as suggestions.
Implementation
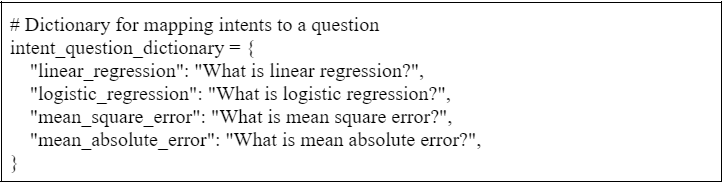
- Firstly we need to create a global dictionary that will have the intent name as the key and the value would be an example query for that intent.
- We will implement the run method of custom action
- Firstly, we need to return an answer for the user’s query. In this example, I will be returning the intent name to which the query is classified. To do so we can use the tracker as follows
tracker.get_intent_of_latest_message() – this will return the intent name - Now, to show this to the user we can use the dispatcher as follows

- Now we need to loop over all the intent classifications based on the ranking and create buttons that will be shown to the user as suggestions. We also need to make sure the buttons generated are only from the dictionary that we have defined in step one this will help us in making sure that the intents like “greet”, “out of scope”, “goodbye” etc. are not shown to the user as the suggestions (because intent ranking would be having these intents too).
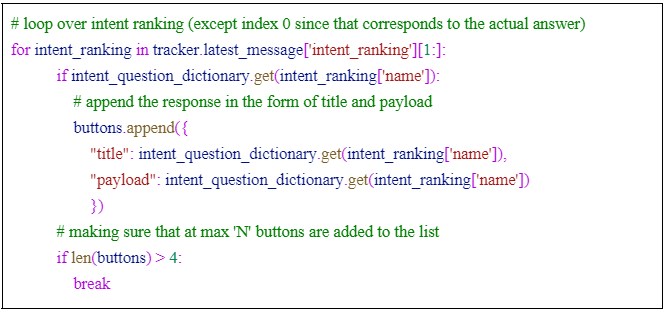
In the end we have also placed a check to make sure we can control the max number of suggestions shown to the user.
- Firstly, we need to return an answer for the user’s query. In this example, I will be returning the intent name to which the query is classified. To do so we can use the tracker as follows
Training model and having a conversation with it
- To start the training we need to run the command
- rasa train
- Once the model is trained we can have a conversation with the chatbot as follows
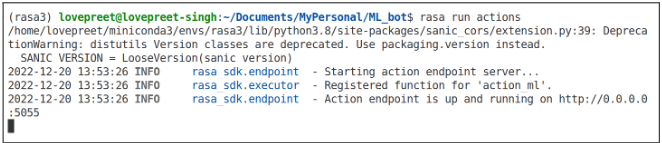
- First we need to run the action server since have implemented the custom action
rasa run actions
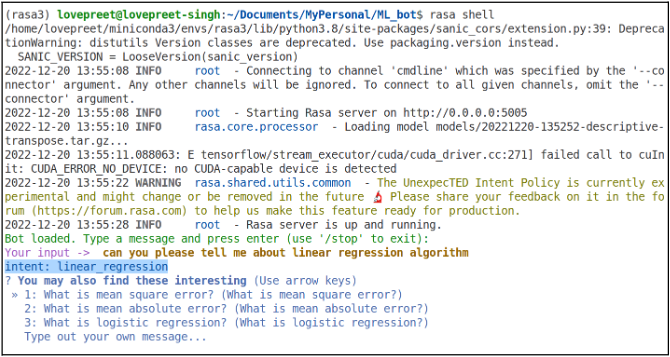
- Then in another terminal we need to run the command
rasa shell
This will start a command line instance of the chatbot through which we can start the conversation
- First we need to run the action server since have implemented the custom action
References: https://rasa.com/docs/rasa/
Contributors: Mr. Bavalpreet Singh and Lovepreet Singh